1. Open Settings Dialog in File\Settings...
2. Select IDE Settings\Editor\Appearance
3. Choose "Show line numbers" and "Show member separators"
2014年1月1日 星期三
[Android Studio] How to change the edit font in Android Studio
1. Open Settings Dialog in File\Settings...
2. Select IDE Settings\Editor\Colors & Fonts\Font
3. Press Save As...
4. Input name in popup dialog and Save
5. Remove Selected fonts and select new Available fonts
6. Press OK.
2. Select IDE Settings\Editor\Colors & Fonts\Font
3. Press Save As...
4. Input name in popup dialog and Save
5. Remove Selected fonts and select new Available fonts
6. Press OK.
2013年4月21日 星期日
[Android] 如何使用Ellispe開啟AndEngine遊戲引擎程式庫
- 首先下載AndEngine 原始碼的存放處: http://code.google.com/p/andengine
- 開啟Ellipse, File > New > Project > Android> Android Project from Existing Code
- 在New Project對話視窗中按"Next",出現Import Project的對話視窗,按下Browse...,找到下載AndEngine 原始碼的路徑
- 按下"Finish",專案完成如下圖
- 在Project的Properties\Android\Project build Target,選擇Android 4.1.2, 且在Library欄位勾選"Is library",然後按"Apply"鍵設定選取的項目
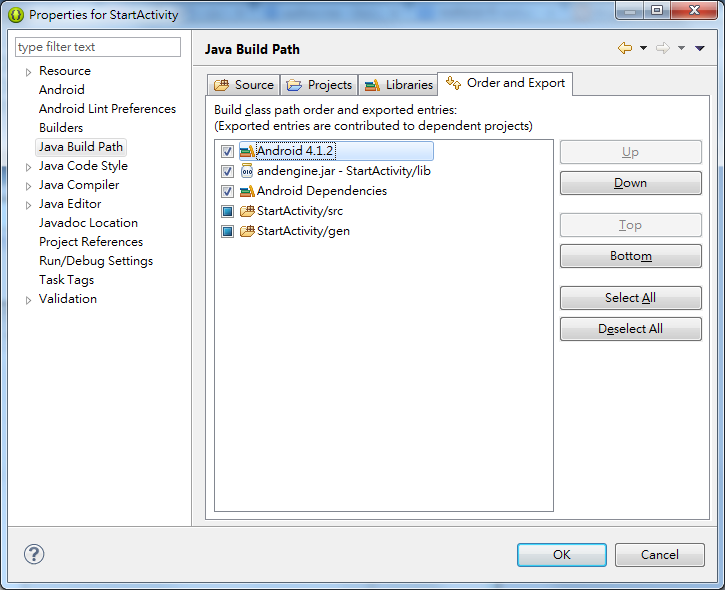
- 在Project的Properties\Java Build Path,勾選Android 4.1.2,然後按"OK"鍵,完成設定。
- 開啟Ellipse, File > New > Project > Android> Android Project from Existing Code
- 在New Project對話視窗中按"Next",出現Import Project的對話視窗,按下Browse...,找到下載AndEngine 原始碼的路徑
- 按下"Finish",專案完成如下圖
- 在Project的Properties\Android\Project build Target,選擇Android 4.1.2, 且在Library欄位勾選"Is library",然後按"Apply"鍵設定選取的項目
- 在Project的Properties\Java Build Path,勾選Android 4.1.2,然後按"OK"鍵,完成設定。
[Android] How to use Ellispe open AndEngine game engine library
First, get AndEngine source download reference: http://code.google.com/p/andengine
Open the Ellipse, File \ New \ Project \ Android \ Android Project from Existing Code
In the New Project dialog window, press the "Next", and Import Project of dialog is shown. In this dialog, press "Browse ..." to set the downloaded path of AndEngine source.
Press "Finish", completion of the opening project as shown below
In the Project \ Properties \ Android \ Project build Target, select Android 4.1.2, and check "Is library in the Library field, and then press the "Apply" button to set the selected item.
In the Project Properties \ Java Build Path, check the Android 4.1.2, then press the "OK" button to complete the setting.
Open the Ellipse, File \ New \ Project \ Android \ Android Project from Existing Code
In the New Project dialog window, press the "Next", and Import Project of dialog is shown. In this dialog, press "Browse ..." to set the downloaded path of AndEngine source.
Press "Finish", completion of the opening project as shown below
In the Project \ Properties \ Android \ Project build Target, select Android 4.1.2, and check "Is library in the Library field, and then press the "Apply" button to set the selected item.
In the Project Properties \ Java Build Path, check the Android 4.1.2, then press the "OK" button to complete the setting.
[Android] 如何成功執行"Learning Android Game Programming" 書上的例子
這篇文章主要是在學習過程中遇到的問題,記下來分享給大家。首先,在
http://www.informit.com/title/9780321769626
下載書上的例子,使用Ellipse開啟並執行程式,一開始出現一片黑的畫面,最後專案已停止的訊息(如下圖),程式無法正常執行的問題。
解決方法:
- 開啟Example,以chapter_2_code\V302為例,開啟Ellipse, File > New > Project > Android> Android Project from Existing Code- 在New Project對話視窗中按"Next",出現Import Project的對話視窗,按下Browse...,設定Root Directory。
- 按下"Finish",專案開啟(如下圖)。
- 然後執行程式,正確出現我們要的結果
[Android] How to run successfully the example apps in "Learning Android Game Programming" book
This article is mainly the problems encountered in the learning process, write it down for everyone to share. First, get the book examples' source:
http://www.informit.com/title/9780321769626
Download the book example, and then using the Ellipse open and run the program. We see the result shown a message (see below) began to appear a black screen, and finally the project has stopped, running properly.
Solution:
This is the description by chapter_2_code \ V302 example.The Ellipse is opened File> New> Project> Android> Android Project from Existing CodeIn the New Project dialog window, press "Next", then appear the Import Project of dialogue window, click "Browse ..." to set the Root Directory.
Press "Finish" project is open (see below).
Then run the program, we want correctly
訂閱:
文章 (Atom)